HitMyNeed
DIY Ultrasonic Levitator Standing Wave Learning Kit
DIY Ultrasonic Levitator Standing Wave Learning Kit
Couldn't load pickup availability
Explore Ultrasonic Levitation and Standing Waves Hands-On
Bring abstract physics concepts to life with this DIY Ultrasonic Levitator Suspension Standing Wave Controller Kit. Designed for teaching, lab demonstrations, and hobby learning, it allows you to assemble, solder, and operate a compact levitation device that visibly suspends tiny objects in mid-air using ultrasonic standing waves.
At the heart of the kit is a 40 kHz ultrasonic system that creates a standing wave field between two facing ultrasonic transducers. When correctly assembled and powered, light objects such as small foam balls or similarly sized particles (around 2-3 mm in diameter) can be trapped and held at the standing wave nodes, clearly demonstrating acoustic radiation pressure and the balance between sound force and gravity. This makes the kit suitable for classroom demonstrations, science clubs, makerspaces, and individual learners who want a deeper, practical understanding of wave physics and electronics.
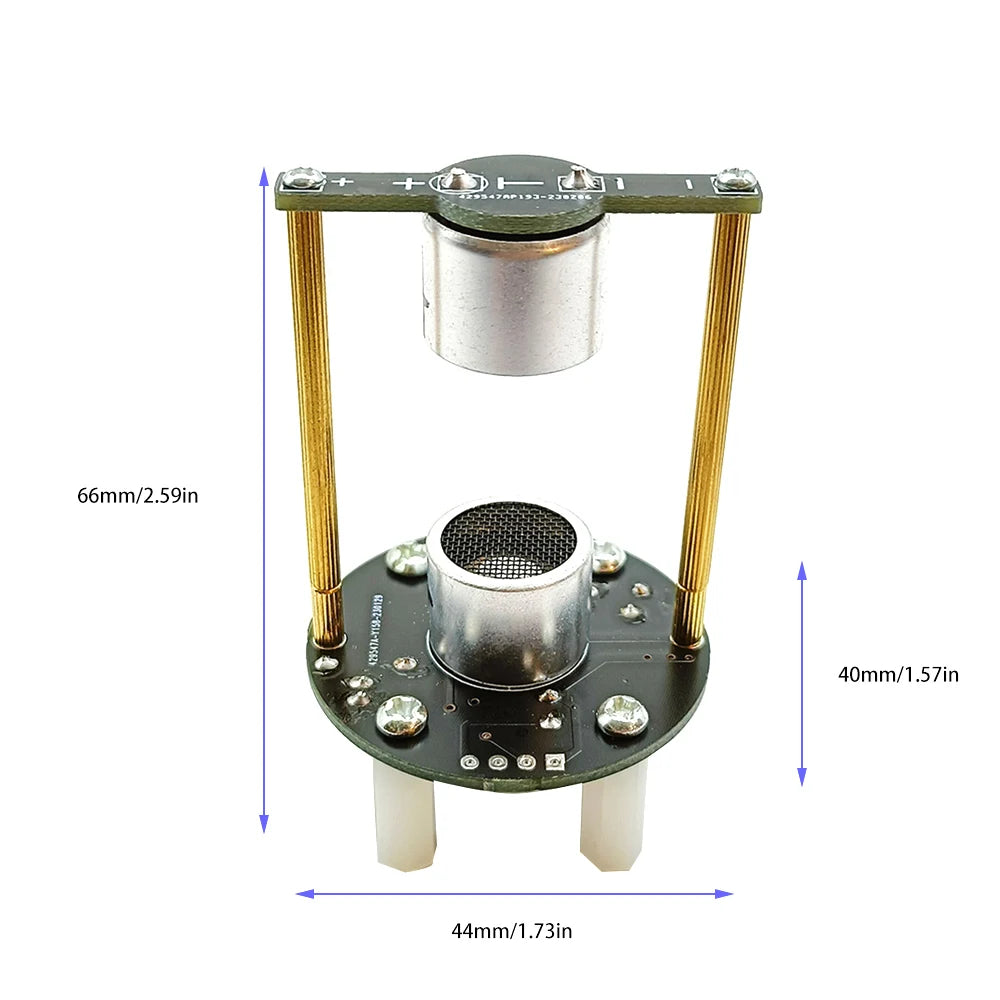
The circuit is based on a microcontroller, driver chip, and two ultrasonic emitters mounted on upper and lower PCBs. Power input is DC 12 V (0.5-1 A), with a typical operating frequency of 40 kHz. The finished assembly has an approximate external size of 44 mm (length) × 40 mm (width) × 66 mm (height), making it compact enough for a benchtop or classroom desk. The working temperature range is approximately −25 °C to 85 °C, allowing use in a variety of indoor environments. During operation, the main board may become slightly warm as the transducers and driver circuitry run continuously.
The working principle is ultrasonic standing wave levitation: a specific separation (resonant cavity distance) is maintained between the transmitting elements so that transmitted and reflected (or opposing) waves continually superimpose to form a standing wave. At the nodes of this standing wave, the acoustic force on small objects can exceed their weight, resulting in visible, stable levitation. This offers a clear, repeatable demonstration of wave interference, resonance, and force fields generated by sound.
The DIY bulk kit includes the upper PCB, lower PCB, a pair of ultrasonic transmitters, assorted screws, copper and nylon standoffs, capacitors, resistors, a red LED, DC power jack, voltage regulator, microcontroller (pre-programmed), and driver IC. These must be soldered and mechanically assembled, making the kit suitable for learners who want to practice component identification, through-hole soldering, and basic electronics assembly. For users who prefer not to solder, a finished ultrasonic levitator version is also available as a separate package option.
Why It's a Smart Choice
- Transforms core physics topics-standing waves, resonance, and acoustic forces-into a visible, hands-on experiment that is easy to demonstrate.
- Develops practical electronics skills through soldering, board assembly, and troubleshooting of a real working device.
- Supports teaching and self-study in physics and electronics, providing a compact, reusable tool for experiments, demonstrations, and science projects.
FAQ
Q: What power supply do I need?
A: The levitator requires a DC 12 V power input with a current capability of approximately 0.5-1 A. A regulated adapter with a matching DC plug is recommended.
Q: How difficult is the assembly and soldering?
A: The DIY version is suitable for users with basic through-hole soldering experience. Components are clearly defined, but beginners should proceed carefully and may benefit from supervision or guidance.
Q: What objects can be levitated?
A: The device is designed to suspend very light objects around 2-3 mm in diameter, such as small foam balls or similarly light particles. Heavier items will not levitate.
Q: Is this kit appropriate for classroom use?
A: Yes. Once assembled, it can be used repeatedly to demonstrate ultrasonic standing waves, levitation, and related physics concepts, making it useful for school labs, university tutorials, and science outreach activities.
Q: Do I need special tools to build the kit?
A: Basic tools such as a soldering iron, solder, wire cutters, and a small screwdriver are typically sufficient for assembly of the DIY package.